 GWM Manual Contents
GWM does not try to enforce any policy in writing profiles, but for the sake of simplicity and maintainability, all the WOOL packages delivered with GWM will try to be compliant with a set of rules, which should assure the compatibility between them.
Note: Distributed code is normally indented under emacs by Alan M. Caroll's amc-lisp.el emacs-lisp package, which is now included in the GWM distribution in the contrib/lisp-modes/ subdirectory.
You can have a look at my personal profile in the file data/profile-colas.gwm if you are looking for actual examples.
The Standard Profile | .profile.gwm |
The standard profile can be customized to your taste by creating a .profile.gwm file in your home directory, or by copying the one in the GWM distribution directory in your home directory and editing it.5
The default behavior for clicking of the mouse buttons is, in a window decoration or an icon:
These functions are enabled only in the GWM-added decoration around the window, or anywhere in the window if the alternate (or meta or left key on some keyboards) modifier key is depressed when clicking, in the uwm style of interaction.
Moreover, if you click in the icon in the upper left of the frame around the xterm windows with the left or right button, the window will be iconified, and with the middle button, it will be iconified and the icon moved just underneath the pointer. You can still move the icon elsewhere by dragging it while the middle button is down.
Whether you want the window to be raised on top of others when performing a move, resize, or (de-)iconify operation can be toggled by setting to t or () the global values raise-on-move, raise-on-resize, and raise-on-iconify.
Customization is achieved by creating a .profile.gwm file in your home directory (or anywhere in your GWMPATH). In this file you can set the variables to modify the standard profile to suit your taste. Note that you must set variables used in decorations before loading this decoration by a set-window or set-icon-window call.
Your .profile.gwm will be loaded once for each screen managed, and since pixmaps, colors, cursors and menus are screen-dependent objects, try to define them as names in the screen. namespace (namespace-make).
The standard mouse button bindings can be redefined by re-defining the default states (state-make) for a click in a window decoration, an icon and the root window, which are respectively the global variables window-behavior, icon-behavior, root-behavior. These states will be used to build the fsms of the windows, icons and root window. The state standard-behavior is included in both window and icon behaviors, so that you can add transitions to it if you want to have them in both contexts. You may then need to redefine the events grabbed by GWM, in the grabs variables; all events in these lists are ``stolen'' from the application and redirected to GWM. There are three grabs variables: root-grabs, window-grabs, and icon-grabs, pointing to the lists of event to be ``grabbed'' from all applications, only from windows, and only for icons. That is why you can move a window by clicking anywhere in it with the left button while depressing the Alt key: the standard grabs consists of the list:
        (list (button any with-alt)
              (button select-button (together with-shift with-alt)))
If you only want to change button bindings, change the value of select-button, action-button, and menu-button, which are initially bound to 1, 2, and 3 respectively.
You need to call the reparse-standard-behaviors function after modifying any of these states to take your changes into account. For instance, to add iconification on the ``F1'' function key only on windows, you would write in your .profile.gwm file:
(reparse-standard-behaviors) ; commit changes
(setq window-grabs ; grab F1 from clients
(+ window-grabs (list (keyrelease "F1" alone))))
(setq window-behavior
(state-make
(on (keyrelease "F1" alone) (iconify-window))
standard-behavior)) ; include previous actions
The following global variables (which are names in the screen. namespace for all pixmaps, colors, cursor and menus) controlling the way the standard profile operates can be set in your .profile.gwm file:
(setq root-cursor (cursor-make "arrow3d"))
Moreover, you can decide to change the decoration (look and feel) of a client or an associated icon by using the following functions.
For most following functions, when a window-description is expected, it means a X resource specification of the form:
client-class.client.name.window-name.machine-name
where *-notation, or ``any'' to means any value for a field is accepted. Note
that all fields are optional, except for client-class.
Thus, you can say that you want all xterm icons to be xterm-icons, except for
the one named Console, on machine avahi, for which you want to use
a simple icon by:
        (set-icon-window XTerm xterm-icon)
        (set-icon-window XTerm*Console.avahi simple-icon)
Note: for all functions, to set defaults for a screen type or a client class, use the any keyword.
Note: Since version 1.7, the values affected to set-window et al. functions are evaluated at decoration time, not while reading the profile as it was the case before.
For instance, these declarations say that xterms on this screen, if it is a monochrome one will be decorated by the simple-ed-win style, but if the screen is a color or grayscale one, will use the simple-win decoration, and will use the ``no-decoration'' style for windows not otherwise describe (The no-decoration window description adds no visible decoration to a window).
        (set-window mono XTerm simple-ed-win)
        (set-window any XTerm simple-win)
        (set-window any no-decoration)
To choose decorations on other criteria than just class, define a function that will return a WOOL expression which will give the good decoration when evaluated. For instance, to put a simple-ed-win decoration on all XTerms, except those less than 200 pixels wide, use this in your .profile.gwm:
        (defun decide-which-xterm-deco ()
            '(if (< window-width 200) (no-frame)
                 (simple-ed-win)))
        (set-window any XTerm decide-which-xterm-deco)
For an example of an alternative choosing function, see match-windowspec.
If a list is given as the last argument, it is evaluated and the pixmap is taken as the result of the evaluation.
Suppose that you designed a picture of a mailbox named ``mail-icon.xbm'', saved it somewhere in your GWMPATH, and want to use it for the icon of the client xmh. You would add in your .profile.gwm one of the two forms:
        (set-icon XMh mail-icon.xbm)
        (set-icon XMh (pixmap-make black "mail-icon.xbm" white))
The icon can also be a color pixmap in the XPM format, loaded then with the ``pixmap-load'' function. In this case, gwm supports the non-rectangular shape that may be specified in the icon file (the transparent colors of XPM), allowing for a great flexibility in icon design.
Note: the icon bitmap can only be set for icon decorations supporting it, such as the (default) simple-icon decoration style.
(set-icon-window XTerm term-icon)
The term-icon argument can be either a client window decoration, a function returning a decoration or a file name, as for the set-window function. On startup, GWM does a:
(set-icon-window any any simple-icon)
Desktop space management placements.gwm |
The standard profile supports functions to automatically place your windows or icons on the screen. These functions manage only some type of clients (or all of them if affected to the any client), and they are called with one argument set to t on opening the window, and to () on closing (destruction) it. They are associated to clients by the calls:
The currently pre-defined placement functions are:
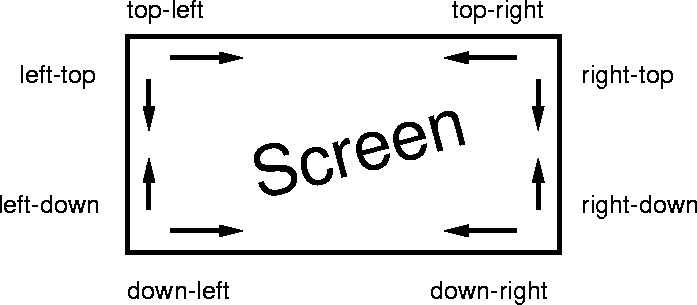
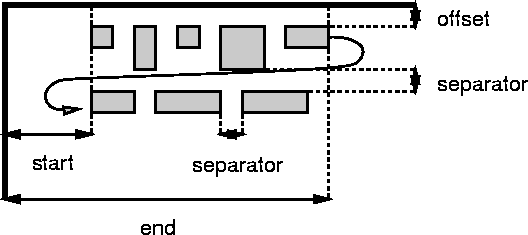
You can set the space where the XXX row lives by issuing calls to the control function rows.limits with the syntax:
(rows.limits rows.XXX [key value] ...)
where key is an atom setting a value (in pixels). Key can be either start, end, offset, and separator as shown in the following figure for XXX = top-left:
key can also be sort, in which case the icon in this row will always be kept sorted by the function given in argument. This function will take two windows as argument, and must return -1, 1, or 0 if the first window must be before, after, or if they have the same precedence. As an example, a sort-icons function is provided; if you set it as a row sorting function, it will sort windows according to their weight as set in the property list icon-order indexed on the class of the application7. Windows having the same weight are sorted by window name. If an application is not found in this list, the value of the variable icon-order-default is used (default 100). Of course, you are free to redesign other sort functions.
For instance you can manage your xterm windows by:
        (set-placement XTerm user-positioning)
        (set-icon-placement any XTerm rows.right-top.placement)
        (rows.limits rows.right-top 'start 100 'separator 2)
        (rows.limits rows.top-left 'sort sort-icons)
You can define your own window placement functions and use them by the set-placement call. They will be called with one argument, t when the window (or icon) is first created, and () when the window is destroyed. This is why we needed an interpretive extension language! An example of another placement routine is given in the user-contributed package near-mouse.gwm.
        (defun do-what-I-mean (flag) ...great code...)
        (set-icon-placement any any do-what-I-mean)
The displayed menus can be redefined by setting the following global variables to menus made with the chosen menu package. The default package is the std-popups package.
You can look at their standard implementation in the def-menus.gwm distribution file.
Jay Berkenbilt's Virtual Screen vscreen.gwm |
This little ``virtual screen'' package, made by Emanuel Jay Berkenbilt, MIT <qjb@ATHENA.MIT.EDU> provides a way to use the physical screen of your workstation as a viewport on a larger root window. You move the screen by keys (default is Ctrl-Alt arrows), can ask for a map of the screen to be displayed (item VS Show in root menu), and to move back to origin (item VS Restore in root menu). This quick-and-dirty package doesn't pretend to compete with Vtwm, but it is a good start.
The current upper left of the screen is shown a cross in the map. Clicking in the map will make it disappear, and the map is a snapshot of the current situation which is not automatically updated.
You can customize it by setting the following variables:
Anders Holst's Virtual Screen virtual.gwm |
This virtual screen package consists of the files virtual.gwm, virtual-door.gwm, virtual-pan.gwm, and load-virtual. It is essentially built upon Jay Berkenbilt's virtual screen package, vscreen.gwm, described above. The main differences are:
To use this package, load load-virtual.gwm somewhere at the end of your ``*rc.gwm'' or ``.profile.gwm''. It will load the other three files mentioned above and set up necessary environment. Check the files virtual.gwm, virtual-door.gwm, and virtual-pan.gwm individually for customization variables.
Adaptation of virtual.gwm std-virtual.gwm |
To use virtual.gwm in a standard profile, load std-virtual.gwm which implements a simple rooms style on top of virtual.gwm. before this you can set up a list of room names (strings) that can be lists of room name, color of the background, and optional context variables to customize the door buttons (see virtual-door.gwm). For instance:
(load "std-virtual.gwm")
(setq std-virtual.doors '(
("Home" screen-background)
("Comp" "LightBlue3")
("Mail"
(pixmap-make (color-make "seagreen3") "grainy"
(color-make "seagreen2"))
background (color-make "seagreen3"))
("WWW" lightgrey door-icon (pixmap-load "netscape-small.xpm"))
("Text" "LightYellow3")
("Games" grey)
))
Icons then are visible in every room, and de-iconifying it via the middle button moves you to the de-iconified window room, or you can by menu de-iconify in the current room. Among them are the standard attributes such as background, foreground, font, tile, and some specific ones such as door-icon for an icon pixmap to be displayed, and door-action for wool code to be executed when entering the room.
Duane Voth's rooms dvrooms.gwm |
Duane Voth (duanev@mpd.tandem.com) made a mini rooms package to manage groups of windows. To use it, put in your .profile.gwm the line
(load "dvrooms")
before any calls to any (set-... call.
Then, with the standard profile, you can add new rooms by the root pop-up menu,
or by explicitly calling the new-dvroom-manager function in your
profile, with the name of the room as arguments.
        (new-dvroom-manager "mail")
        (new-dvroom-manager "dbx")
Only one room is ``open'' (non-iconified) at a time (unless dvroom.icon-box is non-nil), and calling the functions add-to-dvroom or remove-from-dvroom (from the window menu or from WOOL) on a window will add or remove it from the group of windows that will be iconified or de-iconified along with the room manager. Opening a room will close the previously open one, iconifying all its managed windows. New rooms start as icons.
This package will recognize as a room manager any window with the name rmgr. You can then create new rooms by other Unix processes. An X property GWM_ROOM is maintained on windows added to rooms containing the name of the room manager, so that rooms are not lost on restarting GWM.
Context used:
Dwight Shih <dwight@s1.gov> added the functions:
Group Iconification icon-groups.gwm |
Loading the icon-groups package redefines the iconify-window function to use only one icon for all windows of the same group. Iconifying the group leader will iconify all the windows in the group, whereas iconifying a non-leader member of the group will only unmap it and map the common icon if it is not already present.
You can specify which groups you do not want iconified this way by setting their class in the list icon-groups.exclude. For instance, if you want to iconify your XPostits this way, but not you emacs or xmh windows, add this in your .profile.gwm:
        (load "icon-groups")
        (setq icon-groups.exclude '(Xmh Emacs))
It will also add two more items in the menu:
Opaque move move-opaque.gwm |
Loading the move-opaque package redefines the move-window function to move the whole window, not just an outline of it. You can control which windows will be moved this way by setting two context variables:
        (setq move-opaque.condition
            '(< (* window-width window-height)
                move-opaque.cutoff-area)
Delta deltabutton.gwm |
The deltabutton function is used to perform two different action on the press of a button, depending on whether the user release the button without moving the mouse more than deltabutton.delta pixels (defaults to 4) in any direction. To use deltabutton, you must have loaded the deltabutton.gwm file, and in a transition of a fsm triggered by a buttonpress event, this function will wait for the button to be released, and return t if the pointer has moved more than deltabutton.delta pixels, or () if not.
For instance, to raise a window if you click on it, and to move it only if you move the mouse more than 4 pixels, declare in your .profile.gwm:
        (load 'deltabutton)
        (setq standard-behavior
           (state-make
              (on (buttonpress select-button alone)
                  (if (deltabutton)
                      (progn (raise-window)(move-window))
                    (raise-window)))
              standard-behavior))
        (reparse-standard-behaviors)
Floating windows float.gwm |
Rod Whitby <rwhitby@adl.austek.oz.au> made this package to interactively make some windows ``float'' always on top of others, or always ``sink'' to the back of the screen. Loading this package will add a multiple menu item to the window menu to make the current window float Up, Down, or to make it a normal window back again (item ``No'').
Unconfined-move unconf-move.gwm |
Rod Whitby <rwhitby@adl.austek.oz.au> made this package to be able to still move and resize windows out of screen boundaries even when you confined them by confine-windows. With this package loaded, unconfined move is obtained by moving/resizing with Control-Alt mouse buttons, while Alt mouse buttons keep moving/resizing in confined mode.
Suntools-keys suntools-keys.gwm |
Rod Whitby <rwhitby@adl.austek.oz.au> made this package to provide some suntools-like keyboard shortcuts to window management functions:
Mike Newton's Keys mon-keys.gwm |
Mike Newton <newton@gumby.cs.caltech.edu> has contributed another package to add keyboard shortcuts to window management functions.
Standard pop-up menus std-popups.gwm |
This package implements a very simple pop-up menu package. The variables window-pop-items, icon-pop-items, and root-pop-items contains a list of menu item which be used after reading user .profile.gwm to build the actual menus8, which will be named window-pop, icon-pop, and root-pop9.
You can then insert or delete items in this list at will. Nil entries in this list will just be skipped by the actual menu creation routine. You may want to use the function insert-at. Dvrooms and vscreen are example of packages adding menu items in the standard menus.
Menu items can be created with the help of the following functions:
Note: in fact, in the preceding functions, any can be in fact either a string, an already built pixmap which will be used as-is, or WOOL code that will be evaluated and must return a pixmap which will be used to build the menu item.
For instance, the default window menu is the list:
        '((item-make "iconify" (iconify-window))
            (item-make "Exec cut"
                       (execute-string (+ "(? " cut-buffer ")")))
            (item-make "client info" (print-window-info))
            (item-make "redecorate" (re-decorate-window))
            (item-make "kill" (if (not (delete-window))
                                  (kill-window)))
            ))
Moreover, you can control the appearance of the label and the items of the menu by the following variables:
Menus can have a default action, i.e. wool code which is triggered if the user lets go the mouse button before the menu appears. Default actions should be as harmless as possible, of course. They can be set by
(menu-default-action <Menu> <Expr>)
where <Menu> is the menu (window-pop, icon-pop, or root-pop), and <Expr> is the code to be executed.
(menu-default-item <Menu> number)
sets the item in which the mouse cursor is when popping up the menu (defaults to first item).
FrameMaker support framemaker.gwm |
This file, that you can copy in your private gwm directory and modify, attempts to provide some support for framemaker (v3.0) windows, i.e:
Gosling Emacs mouse support emacs-mouse.gwm |
This package implements a way to use the mouse with the Gosling emacs, sold by Interpress. You will need to load the emacs macros contained in the gwm.ml file included in the distribution in your emacs. Then, in a window decorated with the simple-ed-win package, pressing Control and:
Clicking in the mode lines will do a full screen recursive edit on the buffer if not in a target and in the targets:
This package is included rather as an example of things that can be done to work with old non-windowed applications than as a recommended way of developing code.
(customize deco screen window-description
           variable1 value1 variable2 value2...)
Most following sample window and icon decorations can be tailored in a global way by setting global variables in your .profile.gwm before using the decoration, but these variable can be set individually to decorations by use of the customize function. For instance, since the simple-icon documentation tells you that title is added to icons according to the value of the simple-icon.legend global variable, you can say that you do not want legends under your icons, except for xclocks by:
        (set-icon-window XClock simple-icon)
        (setq simple-icon.legend ())
        (customize simple-icon any XClock
                   legend t)
Customize works by defining the customization items in the environnement of
the decoration. Thus,
(customize simple-win any XClock tile t)
Note: In current version, only simple-win, simple-icon, and term-icon decorations support the customize function.
The customization arguments can be given as a single list argument. In other words, both following calls are equivalent:
        (customize simple-icon any XClock legend t
                   background (color-make "green"))
        (customize simple-icon any XClock
                   (legend t
                    background (color-make "green")))
Note: Moreover, customization values can be also given to decorations which support the customize protocol as arguments (do not forget to quote the variable names, the decoration functions evaluate their arguments). Thus we can define a new decoration clock-deco, and use it afterwards just as another decoration with the same results as the preceding examples:
        (require 'simple-icon)     ; simple-icon must be defined
        (setq clock-deco
              (simple-icon legend t
                           background (color-make "green")))
        (set-icon-window XClock clock-deco)
Warning: consecutive calls to customize on the same
window descriptions
overrides descriptions, but do not append to them. In the following case:
        (customize simple-win any XClock background (color-make "green"))
	(customize simple-win any XClock legend "bottom")
Pick a window with the mouse pick.gwm |
This file provides a quite handy way for the user to select a window with the mouse. The main function is (with-picked EXPR) which first lets the user select a window, and then runs EXPR on the selected window. This can be used from eg. a root menu, to implement the style of first selecting in the menu what to do, and then what window to do it to.
You can also use the more basic function (pick-window) which returns the wob number of the picked window. This function considers the variable cursor, as the cursor to show during picking.
Sample window decorations *-win.gwm |
These are standard window decorations which can be used via the set-window function of the standard profile. They can be found in files whose names end in -win.gwm in the distribution directory of GWM.
Simple window simple-win.gwm |
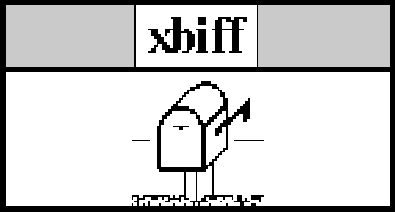
This is a really simple window decoration with only a title bar on top of the window. The name of the window is centered in the bar. The title bar and the name of the window can change appearance when they become ``active'' (i.e. have the keyboard focus).
This style is customizable by setting the following variables at the top of your .profile, before any call to set-window:
As you can see, each variable comes in pair, one for ``inactive'' state, the other for ``active'' state. For each of them, the ``active'' one can bet set to (), which means just use the same value as the ``inactive'' value.
Since this decoration supports the customize function, all the above values can also be set via the customize function, or as arguments to the function simple-win itself. In these cases, not that you must use the name of the variables without the simple-win. prefix, e.g. you could have all simple-win windows with title font written in black, except for XClock by the calls:
        (setq simple-win.active.label.foreground black)
        (customize simple-icon any XClock
                   active.label.foreground (color-make "green"))
Or we can remove the Netscape: prefix on netscape titles by:
        (customize simple-win any Netscape
            label (lambdaq (s) (match "Netscape: \\(.*\\)$" s 1)))
Simple editable window simple-ed-win.gwm |
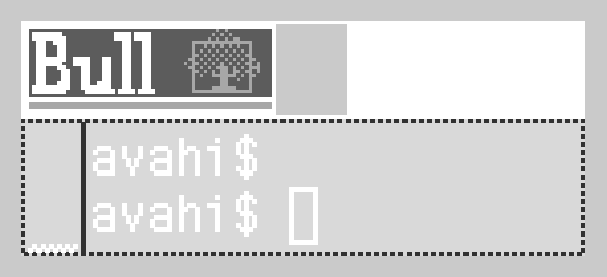
This decoration has a titlebar on top of it, including an iconification plug and an editable name plug. Moreover the whole border changes color to track input focus changes.The look of this frame can be altered by setting the following variables:
When you click in the icon button at the left of the titlebar (whose pixmap can be redefined by setting the global variable icon-pixmap to a pixmap) with the left button, the window is iconified. If you click with the middle button, you will be able to drag the outline of the icon and release it where you want it to be placed.
If you double-click a mouse button, or do a click with the control and alternate keys depressed, in the editable name plug at the right of the titlebar, you will be able to edit the name of the window (and the associated icon name) by a simple keyboard-driven text editor whose keys are are given as strings in the following variables:
The plug will invert itself during the time where it is editable. You quit editing by pressing Return, double-clicking in the plug or exiting the window.
This decoration style also supports the emacs-mouse package.
Frame frame-win.gwm |
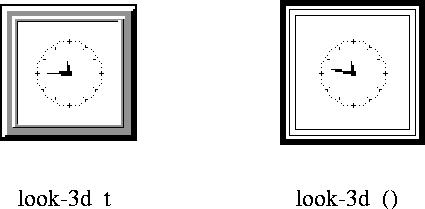
This decoration consists in a frame around the window. The look of this frame can be altered by setting the following variables:
(setq frame.bottom-text '(machine-name))
timeout-win timeout-win.gwm |
timeout-win allows you to specify a command to be applied to a window N seconds after its creation. Very useful to get rid of unwanted pop-ups such as XMH mime requesters each time I go into a mail error message...
It is implemented as a decoration modifier. It will add the timeout functionality to any existing window decoration.
IMPORTANT: the UNIX command gwmsend must be installed in your PATH. Its source can be found in the directory contrib/gwmsend in the GWM distribution.
USAGE: (timeout-win
where options are:
NOTE: you must quote the delay and command keywords, e.g.:
(require 'timeout-win)			; load it if wasnt there
                                        ; mime popups from xmh
(set-window Xmh.confirm
  (timeout-win simple-win 'delay (if (= window-size '(370 70)) 0 10)))
In the above I discriminate the popup to put away immediately by its
size. Popups whos size is 370x70 will be removed immediately,
the other have a 10s timeout. Another example is to iconify Xrn Information
window after 2 seconds:
(set-window XRn.Information
  (timeout-win simple-win 'delay 2 'command "iconify-window"))
This pseudo-decoration obeys the customize protocol under the class name
TimeoutWin and name timeout-win, so that you can say
(customize simple-win any Xmh.confirm 'font fixed)
(customize timeout-win any Xmh.confirm 'command "lower-window")
If you want to be able to set a command to save a window from its coming death, you can make a button or menu item executing (timeout-win.remove-exec) in the context of the window. The timeout is implemented by forking a shell command consisting of a sleep N command followed by a call to gwmsend sending back to GWM the order in WOOL to destroy the window (or perform the command).
Sample icons *-icon.gwm |
These are standard icon windows descriptions which can be used via the set-icon-window function of the standard profile. They can be found in files whose names end in -icon.gwm in the distribution directory of GWM.
Simple icon simple-icon.gwm |
This icon consists in an (optional) image and the icon-name of the window below it. The image is by priority order:
Used context variables:
This decoration supports the customize function.
Terminal display icon term-icon.gwm |
![]()
This icon looks like a small computer display with the window name inside it. Note that the icon resizes itself to adjust to the dimensions of the displayed name.
Used context variables:
This decoration supports the customize function.
Utilities utils.gwm |
This package implements some useful functions for the WOOL programmer. It is automatically loaded by the standard profile. List this file to see the current ones.
(place-3d-button text pencolor maincolor wool-expression)

(place-button text pencolor ulb normal pressed lrb
              wool-expression)
Will create and place as an independent window (of client class Gwm, client name button, and window name text) a 3d-looking window with visual feedback when pressed, which will execute the wool-expression when pressing any button in it. pencolor is the color of the text, and maincolor must be one of the shaded colors in the /usr/lib/X11/rgb.txt file10.
If you want to tailor colors yourself, use the place-button form, where you must choose the upper-left and lower-right border colors as well as the background colors of the button when normal and depressed. place-3d-button calls in fact (place-button text pencolor maincolor1 maincolor2 maincolor3 maincolor4 wool-expression)
To have a demo of this feature, you can execute the (demo-button) function, which will make a button cycling through all the colors in the shaded-colors list.
You can implement different behaviors depending on button pressed and modifier by looking at the value of (current-event-modifier) and (current-event-code) in the wool-expression body. Look at the end of the file profile-colas.gwm for examples.
The following code will create a button that will toggle iconification of all the big postits on my screen, the button being in the thistle range of colors.
      (place-3d-button "Post Big"
        black 'thistle
        '(for window (list-of-windows)
          (if (= window-name 'PostItNoteBig)
            (if window-is-mapped (iconify-window)
              (progn (map-window)(raise-window))
      ))))

(match-windowspec windowspec)
Where windowspec is a property list with 'client-class, 'client-name, and 'window-name as possible tags. Windowspecs can themselves contain regular expressions.
((list 'client-class "XTerm" 'window-name ".*build"))
This code was provided by Jay Berkenbilt <qjb@ATHENA.MIT.EDU>.
(insert-at element list position)
Utility function to insert an element element in a list list at position position. The list is physically modified in place. Useful to insert items in menu lists.
Some user-provided useful little hacks or programming helps have been included too.
Near-mouse near-mouse.gwm |
This placement function was provided by Eyvind Ness <eyvind@hrp.no>.
Saying:
        (require 'near-mouse)
        (set-placement XPostit near-mouse)
The styleguide to write decorations is to be written. Until then, look at existing files such as .gwmrc.gwm, .profile.gwm, simple-ed-win.gwm to see what is the current style. We will appreciate all feedback to these conventions, which are not settled yet.
The main idea is that a decoration package foo should, when loaded, define a foo function which, once executed will return the appropriate decoration, using the pre-defined behaviors.
All persistent variables of the packages should be prefixed by the package name, as in foo.bar.
Do not forget to define in fact one decoration per screen or be cautious not to mix colors, pop-ups, pixmaps and cursors from screen to screen. Use defname screen. to declare screen-specific variables.
The user should be allowed to customize the decoration by setting global variables in its .profile.gwm file, which will be interpreted during the loading of your package.
The fsm you make for your package should be constructed from the behaviors defined in .gwmrc.gwm, such as standard-behavior, standard-title-behavior, window-behavior, icon-behavior, root-behavior, or already built fsms such as fsm, window-fsm, icon-fsm, root-fsm.
All values you want to attach to windows or wobs should be put as properties in the property-list of the wobs, by calls to (## 'key wob value)
The main idea is, if you must modify .gwmrc.gwm to code your window decoration, mail us your desiderata and/or enhancements, so that we should be able to keep the same .gwmrc for all decorations. I maintain mailing lists for people to exchange ideas about GWM. Mail me a request if you are interested at gwm@mirsa.inria.fr.
In the distribution, you can look at the simple-win.gwm file to see how to define a proper decoration. In this file you will see how to define a decoration that supports multiple screens, and some user customization via the customize function. The trick is not to forget to put at build time all necessary information (in the property field of the window) for using later during normal operation, where all code is triggered by the decoration fsms.
Other nice profiles have also been developed in parallel to the standard profile, but they have not been integrated yet, i.e. they need their own .gwmrc.gwm.
The MWM emulation package mwm.gwm |

Frederic Charton made this profile emulating the Motif Window Manager. To use it, you must give the command line option -f mwm to GWM.
You can customize it by copying in your gwm directory (in you GWMPATH) the files:
and editing it. You may want to get the Mwm manual for the description of all the available functions. For instance, to set the input focus management from ``click to type'' (default) to ``real estate'' (input focus is always to the window underneath the pointer), edit mwmrc.gwm and change the line (: keyboardFocusPolicy 'explicit) to (: keyboardFocusPolicy 'pointer).
Warning: This profile is still mono-screen, i.e. to manage 2 screens
on your machine, you must run 2 gwms, for instance by:
        gwm -1 -f mwm unix:0.0 &
        gwm -1 -f mwm unix:0.1 &
The TWM emulation package twm.gwm |
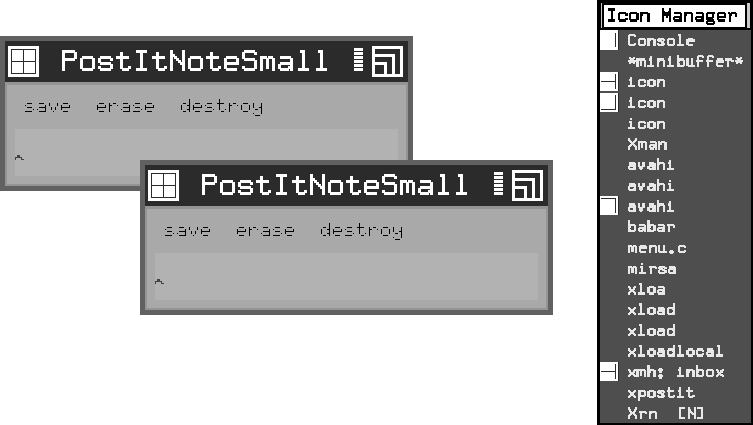
Arup Mukherjee (arup@grasp.cis.upenn.edu) made a Twm emulator. To use it, you must give the command line option -f twm to GWM.
Note: This package seems to be made obsolete by the vtwm package by Anders Holst (aho@nada.kth.se), see below.
You can customize it by copying in your gwm directory (in you GWMPATH) and editing the files:
The VTWM emulation package vtwm.gwm |
This profile, written by Anders Holst (aho@nada.kth.se), is a thorough extension and revision of the TWM profile. It tries to provide most of the look and options you have in the the real Vtwm and Tvtwm window managers. To use it, give the command line option -f vtwm.
All user customization is done in the file vtwmrc.gwm. This includes colors and general appearance, menus, and behaviors. Copy vtwmrc.gwm to your home directory and make the appropriate changes. The file is thoroughly commented, and should be self-explaining.
This profile uses the virtual screen package virtual.gwm. You can move around on the virtual screen by clicking in the map, in the ``doors'', on the pan lists in the edges of the screen, or by the arrows together with some suitable modifiers (Alt is default).
The profile also provides one or multiple icon managers, optionally together with normal icons. See the examples in vtwmrc.gwm to see how multiple icon managers are set up. (These icon managers can be used in other profiles as well, by loading the file load-icon-mgr.gwm. Look in this file for details.)
The VTWM profile honors the use of the standard functions set-window, set-icon, set-icon-window, set-placement and set-icon-placement. (However, if you use some other window than wtwm-window, you should consider setting the variable icon-mgr-window-feedback to nil since this other windows does not tell the icon manager when it gets the input focus.)
The fast profile fast.gwm |
This is a minimal profile, without any window titles, comparable to the obsolete window manager uwm. Useful for quickly restarting a simple window manager while debugging, or for just browsing the code as an example.
To debug a WOOL program, you can: